Thursday, July 31, 2008

Observational Electrolyte test using Ferrous Sulfate

I conduct an observational electrolyte test using ferrous sulfate and observe the results.


My Observations

1. The mixture starts out a cloudy orangish brown.

2. if allowed to sit for a short period a film develops on the surface.

3. After only 30 seconds a bluish green particulate begins to form.

4. The blue-green particulate tends to float and form a scum.

5. After 6-10 minutes the blue-green particulate changes color to orange-brown and begins to sink.

6. The cloudy aspect of the mixture clears up after 5 minutes or so as the particulates begin to appear.

7. Particulates settle throughout the test eventually building to one inch in the bottom after an hour.

8. after an hour or so a slight odor is noticeable.

9. The negative side plate accumulates a dark deposit similar to magnesium sulfate, but in slightly larger quantity.


Electrolytes and Electrolyte Testing Articles


Next: Particulate Comparison Test, Borax and Sea Salt with Calcium Silicate
Previous: After Electrolysis Observations; Sea salt & Calcium Silicate

More Info on Making SS Stranded Wire

I share more information on making stainless steel stranded wire from a single 19 guage wire.


Adaptive Engineering Articles


Related: How to make Stranded Wire From Solid Wire
Next:
Previous: Test and Set a Variable Pressure Relief Valve

Test & Set a Variable Pressure Relief Valve

I test and set a variable pressure relief valve using reckoning(or estimation).


My Findings

1. The yellow spring is for the lowest pressure range: 20-50PSI

2. The relief valve is relatively insensitive.

3. After spring contact with the valve between 1/8th and 1/4 turn should yield between 22 and 26 pounds blow off pressure.

Adaptive Engineering Articles


Next:
Previous: More Info on Making SS Stranded Wire

Grade School Science Fun with a Nine Volt Battery

I have a bit of fun with a nine volt battery and a container of electrolyte.


What did I learn?

1. Hydrogen makes really fine bubbles.

2. Oxygen makes relatively large bubbles

3. Hydrogen is attracted to the negative terminal

4. Oxygen is attracted to the positive terminal

5. The relative bubble sizes can be explained by the atomic weight of the two molecules. Since hydrogen is so light, it stands to reason that it would tend to breakaway from the electrode sooner than the oxygen would.

6. One proof is in the oxidation that occurs on the positive electrode of the battery.

Wednesday, July 30, 2008

After Electrolysis Observations; Sea Salt & Calcium Silicate

I make some significant observations regarding sea salt and calcium silicate.


My Observations

1. The amount of particulate is extreme and has a dark almost black appearance.

2. CLR does NOT cleanup the plates worth a darn.

3. The Positive(?) plate is eroded pretty badly. The erosion is most notable along the plate edges and pitting pretty bad on the side of the plate facing the negative plate.

4. The gunk even blackens the CLR.

5. The temperature electrode was pitted as well.

6. I suspect if there ever was a candidate for Cr(VI) or Hexavalent Chromium reduction, this sample is it. The mere evidence of erosion of one of the plates is proof enough that there is significant chromium in the particulate.

Electrolyte & Electrolyte Testing Articles


Related: Precipitate Comparison Test; Borax and Sea Salt with Calcium Silicate
Next: Observational Electrolyte Test Using Ferrous Sulfate
Previous: Observational Electrolysis Test Using Sea Salt

Safety Info on Four Inch PVC Pipe

I went down to the plumbing supply house today and rounded up some info on 4 inch PVC pipe that I believe folks ought to know.


What I learned is:

1. There are more types of PVC pipe than you may suspect.

2. I know of three schedules: Sched 20, Sched 40, and Sched 80.

3. Sched 20 has 1/8" sidewall on 4 inch pipe. Sched 40 has 1/4" sidewall. Sched 80 has to be ordered(at least at the business I went to) so the sidewall thickness couldn't be checked.

4. There are at least two types of core: foam core and solid core. The foam core is NOT able to withstand pressure. If you buy pipe and see bubbles inside the cut end it is not worth a hill of beans as a container.

5. Pipe that does not have a pressure rating is not suitable to withstand pressure. The pressure rating is found just after the SCHED rating.

6. The plumbing supply house "might" cut the length you want, but SCHED 40 solid core pressure rated PVC pipe only arrives in 20 foot lengths. That means you are looking at 45-50 Dollars in outlay for a container that is about 8-10 inches long. Yikes!

UPDATED: More Info on PVC pipe

7. Great link on PVC pipe pressure ratings: Engineeringtoolbox.com. I note that the pressure rating on this site is noticably lower than the pressure rating of the pipe I bought. This is due to the figures being the industry standard. Individual pipe manufacturers are likely to exceed these numbers and will state so on thir product if they do. If not then go with the industry standard.

8. PVC pipe derates to 20 percent at 140F and long term failure occurs above that. Check the link at Engineeringtoolbox.com.


I think this means PVC pipe should be abandoned and move to one of the other plastic pipe materials unless a non-heat environment can be achieved. According to the charts, PB and PEX perform the best in heat conditions, but have about 40 percent of the strength of PVC. CPVC performs marginally better with heat, but has the same strength properties as PVC.

Thanks to commenters for the additional data and links!

Monday, July 28, 2008

Observational Electrolysis Test Using Sea Salt

I conduct a observational electrolysis test using sea salt with calcium silicate(yes, that's what the box states is in it) and observe the results.

I don't recommend anyone duplicating this test because Chlorine gas can be produced by the test.


My Observations

1. Good gas production is observed.

2. Holy cow! enough particulate to clog a landfill! Now if that ain't a bucket of mud I don't know what is!

3. Needless to say there's no need to recommend San Fransisco Bay Sea Salt as an electrolyte!

Electrolytes & Electrolyte Testing Articles


Next: After Electrolysis Observations; Sea Salt & Calcium Silicate
Previous: Observational Electrolyte Test using Borax

Observational Electrolyte Test using Borax

I conducted an observational electrolyte test using borax and comment on the results.


My Observations

1. Foam begins to appear at around 5 minutes into the test

2. Once the foam thickens an occasional large bubble forms sometimes more of them but just a few at a time.

3. White particulate forms in minute quantities.

4. Particulate gradually changes to orange-brown

5. Particulate formation increases toward end of test. This leads me to believe the particulate formation is delayed compared to other electrolytes

6. White foam picks up some brown color before dissipating.

7. Once the foam dissipates, it leaves a scum behind.

8. For this test the brown particulate accumulation was light.

9. The plate has a gray buildup similar to what was observed with magnesium sulfate.

Electrolytes & Electrolyte Testing Articles


Next: Observational Electrolysis Test using Sea Salt
Previous: Calcium Hydroxide Electrolyte After Test Obaservations

Calcium Hydroxide Electrolyte After Test Observations

I make some after test observations of using Calcium Hydroxide as an electrolyte. I lost a clip that showed the particulate settling, but the action was so slow I would have needed to speed it up somehow.


My After Test Observations

1. Calcium Hydroxide leaves hard water deposits on the glass surfaces. I'm sure it would apply to plastic or stainless steel as well.

2. The electrolyte leaves a hard deposit raft on the surface if left for a few days. This may be because it was a saturated solution. The weaker solution in the second test will provide some insight into this phenomenon.

3. The particulate settles out like watching the mass self compress leaving almost clear water above it. Most other compounds settle out like watching a blizzard that tapers off.

Electrolytes & Electrolyte Testing Articles


Next: Observational Electrolyte Test Using Borax
Previous: Adjusted Concentration for Calcium Hydroxide Electrolyte Test

Sunday, July 27, 2008

Building a Housing for an Electric Watt Hour Meter

I decided I needed to know how much electricity I'm using to do my experiments, so I went out and shopped victoriously on Ebay for an electric meter. The meter I bought is an older model, a General Electric GE IW-70-S which only sports 4 main wiring blades. The newer model I-70-S has 5 or 6 main wiring blades and will be wired differently than the one I have.

Once It arrived in the mail I was left with the dilemma of how to actually put it to use. The answer showed up in the form of a woodworking 101 project.


The entire project took about 4 hours of my time over two days and cost me a total of around 60-65 Dollars. It would be more or less depending on the meter since they are running 10 to 40 bucks and what bells and whistles you would want on your housing.

Here's some support info for the meter housing.


The list of wiring guides are at the General Electric Meter Wiring Guides in case you are using a different model of GE meter.

And the Parts List

  • (1) Carry handle
  • (1) used extension cord to be remade into the power cord (20 feet will do)
  • (1) pound box of 2" deck screws
  • (1) 1"x10"x8' pine board to cut down according to MB-1
  • (1) 9" 2"x4" scrap board to cut down to 1"x1-1/2"x9"
  • (4) 1/4"-20x1" bolts
  • (4) 1/4"-20 nuts
  • (8) 1/4" washers
  • (2) 3/8"-16x2" Bolts
  • (2) 3/8"-16 nuts
  • (2) 3/8" washers
  • (2) Coat Hooks with mounting screws
  • (1) JB Weld or equivalent epoxy
  • (2) 1-5/8" Screws
  • (1) 3 gang electrical box, old work
  • (1) 3 gang switch cover, large square type
  • (1) rocker type light switch
  • (2) outlets, square face type
  • (1) 5 foot length 12/2 or 14/2 electrical wire.
  • (1) GE Watt Hour Meter, IW-70-S model preferred, but I-70-S works too.
javascript:void(0)
Publish Post

Gadgets & Gizmos Articles


Next: Receiving and Setting Up a Scan Gauge II
Previous:

Lab Projects Articles


Next:
Previous: Changes to the Test Pressure Chamber

Thursday, July 24, 2008

Demo of a 70 PSI 70 CFM Blow Off Valve

I demonstrate how a blow off valve works and speculate on what else it could be used for.


Unless I'm mistaken I would work as a flasback blow off valve on an electrolyzer just as well. That's a test for another day!

Aborted Ford Gauge Type Oil Pressure Sensor Test

I explain why I aborted the test of the Ford Gauge Type oil pressure sensor.


Would you test something where the only difference between one type and another is the cost? Me neither.

Changes to the Test Pressure Chamber

I go over the changes I've made to the test pressure chamber I built to test oil pressure sensors.


Essentially I added the pressure blow off valve to the rig and just wanted to show it off. Neener Neener.

Lab Projects Articles


Next: Building a Housing for an Electric Watt Hour Meter
Previous: Building a Pressure Chamber to Test Oil Pressure Sensors

Adjusted Concentration for Calcium Hydroxide Electrolyte Test

I conduct a second test using Calcium Hydroxide as the electrolyte. The concentration this time was 1/4 teaspoon per gallon.


My Observations

1. The gas production is moderate at best.

2. there are very low levels of particulate when compared to 1 teaspoon per gallon.

3. The amperage is very low indicating the electrolyte could be in stronger concentration, but the cost of doing so may be to filter out the white particulate before use.

4. There is a considerable amount of scum that forms at this concentration. It may dissipate over time, but did not do so in the hour and 45 minutes I ran the test.

Electrolytes & Electrolyte Testing Articles


Next: Calcium Hydroxide Electrolyte After Test Observations
Previous:

Results of Straining Particulate from Baking Soda Electrolyte

I show the results of straining particulate from baking soda electrolyte.


Yep, looks like a dirty diaper to me!

Adjusting the Recipe for Reducing Hexevalent Chromium in Vinegar

I take the time to adjust the recipe for reducing hexevalent chromium in vinegar and record the results.


My Observations

1. It takes quite a bit more calcium hydroxide to cause seperation of the particulates. 6-6 1/2 Tablespoons versus 1/2 Tablespoon.

Hexavalent Chromium Articles


Related: Electrolysis Testing with Only Distilled White Vinegar
Next:
Previous: Hexavalent Chromium Initial Test

Remedial Electronics for Myself

I admit being a huge electronics boob; a neandertal of sorts in this area, so I set out to change this just a bit by going out and buying the things that will enable me to reduce this handicap.


The Snap Kit can be found at Radio Shack

The Arrl Handbook for Radio Communications can be found at Amazon.com.

Particulate Comparison Between Magnesium Sulfate and Baking Soda

I compare the water samples from electrolysis testing between Magnesium Sulfate and Baking Soda. There's clearly more particulate from the Magnesium Sulfate.


My Observations

1. It occured to me that many electrolytes are producing particulate, so I wonder if they can be rendered suitable in combinations like baking soda and vinegar can.

Wednesday, July 23, 2008

Demo Incorporating an On-On Switch in an Electrolysis Circuit

I demonstrate how an On-On switch can be incorporated into an electrolysis circuit on a car to provide control over the electrolysis while continuing to allow the oil pressure sensor to do it's job of monitoring the engine oil pressure.


The Schematic should help those that need a piece of paper to see how it works.


The On-ON switch I used can be found at Unicorn Electronics

Saturation Test with Calcium Hydroxide in purified water

I conducted a water saturation test with calcium hydroxide (lime) in purified water and observed the results.


My Observations

1. Calcium Hydroxide resists going into solution.

2. To get the desired concentration, the water has to be heated or allowed to stand before filtering the undissolved portion of the calcium hydroxide.

Electrolysis Test with Calcium Hydroxide

I conduct an electroysis test with calcium hydroxide (lime) in reverse osmosis purified water.


My Observations

1. Calcium Hydroxide does not readily disolve in water.

2. The one tablespoon per gallon used creates a lot of white precipitate.

3. Heating or standing may allow more to dissolve.

4. Remaining precipitate should be filtered before using

5. Foam forms near the beginning of the test but dissipates between 40 and 60 minutes into the test.

6. Brown particulate forms in considerable quantities and forms larger flakes than other tests.

7. Good gas production is observed.

Tuesday, July 22, 2008

Hexavalent Chormium Initial Test

I conducted an observational test of adding ferrous sulfate and calcium hydroxide (lime) to my water samples in order to reduce the Hexavalent Chromium, Cr(VI) to Trivalent Chromium, Cr(III).


My Observations

1. The sludge forms as predicted in the research in three of the four tests.

2. The failed test involved vinegar in 5% concentration. I anticipate the acidity of the water affected the formation of sludge, so the next test will adjust the amount of lime in an attempt to neutralize the acid.

Hexevalent Chromium Articles


Next: Adjusting the Recipe for Reducing Hexevalent Chromium in Vinegar
Previous: Reducing Hexevalent Chromium in Waste Water

Demonstrate Using an Oil Pressure Sensor to Control Electrolysis

I perform a demonstration of how an oil sensor can be used to control electrolysis.


The results show the idiot light type of sensor is suitable for use as a switch to control electrolysis

First Operational Test of an Oil Sensor

I conducted the first test of an oil sensor and comment on the results in this film clip. The sensor I used was a Ford Idiot light sensor type. This type just causes a light to come on on the dashboard if the oil pressure fails.


My Observations

1. The switch closes at 3-5 pounds of pressure and the resistance goes to 1 Ohm.

2. The switch opens at about 3 pounds of pressure and the resistance goes to infinity.

3. Idiot light type oil pressure sensor switches are well suited to use as a control mechanism for electrolysis.

Electrolysis Test Using Magnesium Sulfate

I conducted electrolysis testing using magnesium sulfate(Epsom Salts) as the eletrolyte and observed the results.


My Observations

1. The scum is must likely caused by the magnesium.

2. The scum builds for arround 40 minutes and then seems to dissipate around 50% towards the end of the test.

3. The brown particulate forms in the highest quantity to date.

4. Bubble formation seems to be good for the concentration and amperage

Monday, July 21, 2008

Building a Pressure Chamber to Test Oil Pressure Sensors

I got a crazy idea to test how oil pressure sensors actually work and this lab project is the result.


Parts List


  • (1) gas bottle, (never had gas is safe, used is cheaper)
  • (3) 1/2" black pipe tees
  • (3) 1/2" close fit black pipe (or the shortest pipe available)
  • (1) 3/4" to 1/2" Black Pipe Pipe Adapter
  • (4) 1/2" to 1/4" Black Pipe Adapter
  • (2) 1/4" brass male air connector
  • (2) 1/4" quarter turn air valves, male/female
  • (1) 1/4" air coupler, male
  • (1) 1/4" air coupler, female
  • (1) 1/4" Air Pressure Gauge
  • (1) 1/4" Air Coupler Quick Connect, female
  • (1) An oil pressure sensor that fits your vehicle


Personally I like to be able to drive my truck while I'm experimenting, otherwise I could just use the oil pressure sensor that's already on it.

The Ford oil pressure sensor I bought fits a 1/4" pipe adapter. Other makes and models may be different, so in that case you would have to adjust the parts list to get the sensor to fit. In the case of a metric sensor, fitment may be difficult without making your own adapter using a black pipe cap that you cut a hole in and tap to fit.

Lab Projects Articles


Next: Changes to the Test Pressure Chamber
Previous: Demo of Auxiliary Power Input on the Test Control Panel

Observations of Electrolyzed Vinegar After Settling

I make some quick observations of vinegar after settling for a day and a half.


My Observations:

Pure vinegar remains cloudy(about like grapefruit juice) after one and a half days.

Some white/chalky particulate settled to the bottom. The volume of the settled substance was similar to the baking soda and vinegar recipe I tried earlier.

The plates have some white substance on them, about like the brown particulate found on the plates after Sodium Hydroxide and also Baking Soda.

CLR removes the white substance, but about half as fast as the brown particulate.

Thursday, July 17, 2008

Demo of a 12 Volt 30 Amp Relay in My Test Control Panel

I demo a test setup of a 12 Volt 30 Amp Relay wired into my Test Control Panel.


For those that want to know, I found the relay at Radio Shack.

Why am I Using Glass Sugar Jars and Crayons?

I talk about using glass sugar jars to conduct and store experiments in and crayons to keep track of what's in the jar.

Brown Particulate Comparison between Baking Soda and Baking Soda w/ Vinegar

I compare the brown particulate that accumulates from hydroxy production between using baking soda and baking soda with vinegar as the electrolytes.


My Observations:

The baking soda only has considerably more brown particulate than the mix of baking soda and vinegar.

The baking soda only particulate is slightly darker than the mix.

I think someone is right about Baking Soda and vinegar as a mix. Playing with the receipe should yield better results.

Electrolysis Testing with Only Distilled White Vinegar

I had a YouTube viewer comment that vinegar is being used in full concentration by folks, so I decided it was worth a test to see how it performs.


My Observations:

I think to use vinegar it should be in a higher concentration than the 5% variety found at the supermarket.

It makes a lot of cloudy light yellow-green particulate

It makes more foam than other electrolytes, but not necessarily enough to render it unusable.

Production is moderate, but the Amp draw is very low.

The electrolyte didn't reach nearly the same temperature as baking soda or sodium hydroxide.

Wednesday, July 16, 2008

Comparing Brown Particulate from Three Tests

I compare the brown particuulate from three different tests and make observations from them.


The Sodium Hydroxide and distilled water produces the least amount of brown particulate.

The Sodium Hydroxide and softened water produces more brown, in addition it is slightly darker brown, and there are clear crystel flakes in the particulate.

The Baking Soda and distilled, mineralized water has the largest accumulation of brown particulate.

Electrolysis Test; Baking Soda, Vinegar & Distilled Water

I conduct an electrolysis test using baking soda and vinegar in distilled water to observe the formation of brown particulate.


I observe that there is increased surface tension for the early portion of the test which slightly increases the number of bubbles sitting on the surface. This dissipates during the test.

Brown particulate formation is retarded by approximately half plus individual particles are much smaller compared to just baking soda.

Baking Soda in Distilled Water Electrolysis Test

I conduct an electrolysis test with baking soda in distilled, mineralized water. I know from reading and watching film clips that brown particulate will form. I'm interrested in observing the brown formation and the test in general.


I did observe the brown particulate form in larger quantities than previously observed. I also observed that when steam begins to form, it interferes with gas combustion.

Demo of Auxilliary Power Input on the Test Control Panel

Out of frustration at having now burned up two ATX power supplies on my Test Control Panel, I installed an auxiliary power input circuit. The clip is a brief demo of the circuit while it's in use.


The auxiliary power input gives me better organization, a switch, and some ability to control the test setup.

Lab Projects Articles


Next: Building a Pressure Chamber to Test Oil Pressure Sensors
Previous: Building a Hydrogen Exhaust Hood

Electrolyte Test Using CLR in Distilled Water

A YouTube viewer asked me about using CLR as an electrolyte and I didn't know the answer. This video clip is the result.


I observed a large amount of fine foam that formed during the test. For this reason I determined that CLR is not suitable as an electrolyte by itself.

Electrolysis Test of Vinegar in Distilled Water

I conduct a series of tests to determine the suitability of vinegar as an electrolyte in distilled water.


I determine that vinegar is too diluted to be useful as an electrolyte for hydroxy production by itself.

Nusery Brand Distilled Mineralized Water Test

So this morning I'm off to Walgreen's to get some distilled water so I can do some electrolyte observation tests. Of course when I get there I find out the old trusty distilled water has been replaced by the Nursery brand distilled mineralized water.

Now I need distilled water for my tests, but don't feel like chasing all over town for some H2O. I figure, what the heck, and buy a couple of gallons just to see what happens.

This video is the benchmark test just to see what happens when I use it as is, without any electrolyte.


The result is it just barely produces any hydroxy, so I'll take a chance on it today.

Tuesday, July 15, 2008

Cleaning Stainless Steel Plate Assemblies with CLR

An HHO co-conspirator gave me a pretty cool tip on cleaning my stainless steel plate assemblies with CLR. So I decided to give it whirl.


Bottom line is: It works!

Basic Electronic Soldering Kit

I spend a moment talking about what you would need for a basic electronic soldering kit.


The basic list is:

  • Electronic Soldering Station(Elenco is fine for a beginner)
  • distilled water(for the sponge)
  • Heat Sink
  • scraper and brush set
  • Third hand magnifying and clamp set
  • rosin core solder
  • rosin

Monday, July 14, 2008

Plate Configuration Nomenclature 101

I've seen people around the Internet referring to their plate configurations using a particular method that seems to make sense.

So for those of you that aren't knowledgeable on this yet I'll attempt to explain it.

UPDATED: 29 July, 2008
UPDATED AGAIN: 9 August, 2008

General Concepts


For this section all plates, pipes, strips, rods, springs or any other shape that is used to electrolyze water is an electrode.

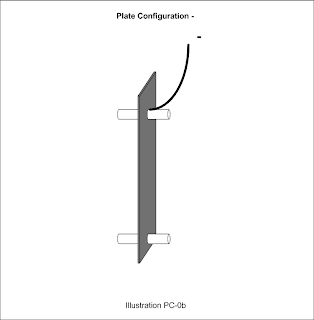
An electrode that is connected directly to the positive lead is designated with a plus sign (+).


An electrode that is connected directly to the negative lead is designated with a minus sign (-).


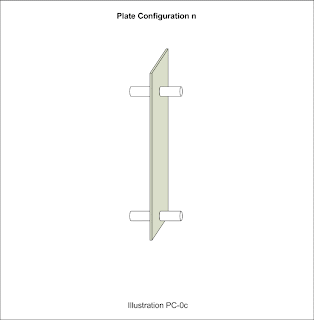
Electrodes that are not connected to either positive or negative leads, but are placed between them are both positive on one side and negative on the other. This is due to current jumping from the positive electrode to the negative surface of the unconnected electrode, then flowing through the electrode to the other side where it jumps off what is now the positive side of the electrode to the negative side of the adjoining electrode. These electrodes are referred to as neutral plates and are designated with the letter n.


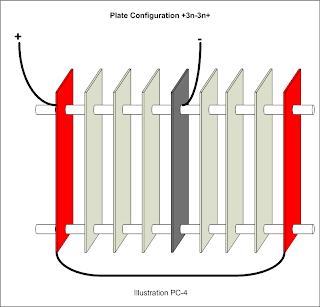
Whenever three or more neutral electrodes are together in a design, the number of 'n's can be replaced by the actual number of adjacent neutral electrodes followed by an n. For example, there is a 31 plate design floating around the Internet and to use this example it would have 29 neutral electrodes in its configuration. This particular design would be written as such: +29n-.

For assemblies that use isolated cells use square braces [] to designate series configuration and parentheses {} to indicate parallel configuration.


Plate Assemblies


Plate assemblies can be flat, conical or bowled in shape, but generally flat and made from sheet metal. Plate assemblies are the dominant form of electrode so a designation normally is omitted. However, if needed the letter P may be used to designate plates like so: +P- If a plate assembly is conical, then the C modifier would be used like so: +CP- Likewise if a plate assembly is bowled, then the B modifier is used like so: +BP-

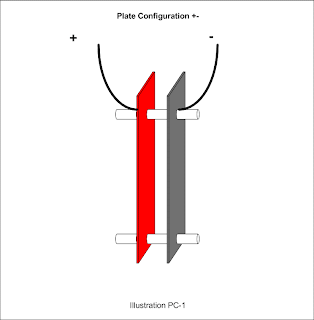
A really simple plate assembly with just one positive plate and one negative plate would have the nomenclature +-.


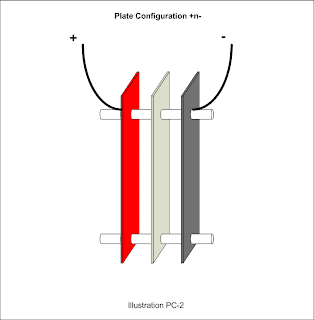
A slightly more complicated plate assembly with a neutral plate in the middle would be designated +n-.


A third example, where 6 plates alternate between positive and negative would have the following nomenclature: +-+-+-.


A fourth design with the negative plate in the center and positive plates on either end would look like this: +nnn-nnn+. The only difference from one variation to another would be the number of neutral plates.


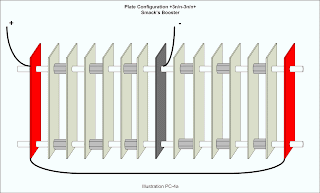
The Smack's Booster design employs neutral plates that are connected electrically. To account for electrically connected neutral plates, use the / character between n's. It would look like this: +3n/n-3n/n+ to designate three pairs of connected neutral plates on either side of the negative plate. To improve readability the same design may include parentheses like so: +3(n/n)-3(n/n)+


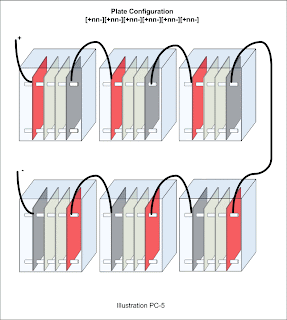
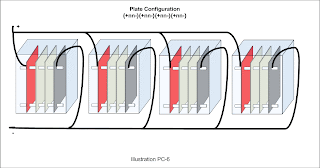
A multi-cell design with 6 cells wired in series may look like so:
[+nn-][+nn-][+nn-][+nn-][+nn-][+nn-]. The same design my be abbreviated thus: 6[+nn-]


A multi-cell design with 4 cells wired in parallel may look like this:
{+nn-}{+nn-}{+nn-}{+nn-} or like this: 4{+nn-}


Pipe and Rod Assemblies


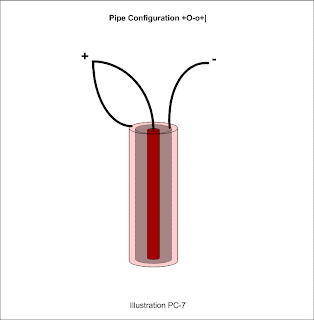
For pipe and rod type configurations, use the Capitol O for a outer pipe, the Small o for an inner pipe and the pipe character | for a rod. To write this nomenclature, first enter the polarity then the characteristic letter and repeat until finished. So a Pipe/Pipe/Rod configuration might be written +O-o+|.


To designate multiples, simply enter the number in the configuration and put the configuration in square braces or parentheses to indicate the connection type, like so 4[+O-o+|] to indicate 4 assemblies wired in series or 4{+O-o+|} to indicate the same but in parallel. If the four assemblies are in the same cell, then it would be written this way: [4(+O-o+|)] although they are more likely in parallel: {4(+O-o+|)}

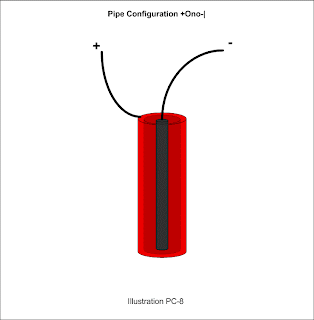
Another possibility with the Pipe/Pipe/Rod configuration is that of the small pipe being neutral. It might look like so: +Ono-|.


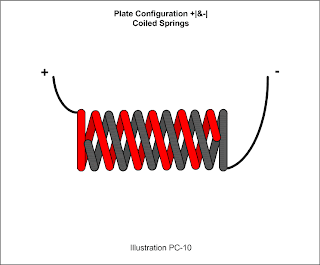
Helical and Spring Designs


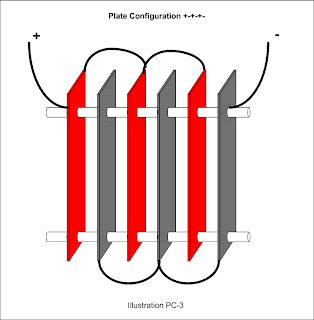
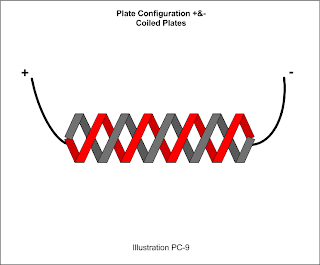
Additionally, for the one helical and one spring design I've seen, I suggest using the Ampersand (&) to indicate such. This example would be +&- to indicate the two plates actually wrap around each other.


For a spring design, the main difference would be that it is designated as a rod like so: +|&-|


Spiral Designs


A spiral assembly is one where the plates wrap one around the other to make a sort of compact spring. This type would be designated with the @ symbol like this: +@-.


Conclusion


From this a large variety of electrode combinations and designs can be represented; thus anyone should to be able to replicate a design from the plate configuration nomenclature and the plate dimension specifications. If I've missed something, please let me know.

Glossary


Polarity Designations
+ : Positive Electrode
- : Negative Electrode
n : Neutral Electrode

Wiring Designations
/ : Electrically Connected Plates(usually with a metallic nut, washers or spacers)
[] : Series wiring Configuration
{} : Parallel wiring Configuration

Shape Designations
P : Plate, optional
B : Bowled modifier for plate
C : Conical modifier for plate
O : Outer Pipe
o : Inner Pipe
| : Rod
& : Spring or Helix depending on rod or plate electrode
@ : Spiral plates

Multiplier and Grouping Designations
1-99 : The number of times to repeat the following designation.
() : Designation grouping. Used for improved readability.
[] : Series wiring Configuration (Indicates everything inside the braces are in a single cell)
{} : Parallel wiring Configuration (indicates everything inside the parentheses are inside a single cell)

Documentation & Terminology Articles


Next: Proposed Electrolysis Supplementation System Block Diagram
Previous: What on Earth am I Doing?

Saturday, July 12, 2008

Building a Hydrogen Exhaust Hood

I spent the better part of two days building a hydrogen exhaust hood and while the result is worth the effort I'm getting a bit tired of my old camera cutting off on me.


The entire project cost me about 40 Dollars and it is the very essence of "cheap but effective". If you have need of something similar, I hope this serves as an inspiration for ya.

Lab Projects Articles


Next: Demo of Auxiliary Power Input on the Test Control Panel
Previous: Test Enclosure Parts and Plans

Friday, July 11, 2008

Some Test Recording Equipment

I ramble on a bit about some of the test equipment I use and would recommend for anyone wishing to record their tests and experiments.


In short, a camera, a tripod and a battery charger with rechargable batteries are all essientiel to recording experiments.

Brown Scum Test with Salt Softened Water

I conduct an electrolysis test using salt softened water to observe the formation of scum and brown particulate.


I conclude that there is much higher formation of brown particulate, but no scum.

UPDATE:
I had a viewer on YouTube ask me about the danger of chlorine formation with this test, and the answer lies in how a salt based water softener works. In short, a salt based water softener replaces calcium and magnesium with sodium in the water to prevent scale buildup and coincidentally improve the taste of the water.

Comparing this test to ordinary tap water reveals that the scum component is probably the result of magnesium or calcium interfering with the bubbles on the surface, while the brown particulate increase is most likely increased levels of hexavalent chromium and ferrous oxide, the compound formerly known as rust. Both compounds are similar in color, so it is impossible for me to discern which one is more dominant at this time.

Thursday, July 10, 2008

Brown Scum Test with Plumber's Silicone Grease

I conduct a brown scum test using a daub of plumber's silicone grease to observe the brown and scum formation during hydroxy electrolysis.


I conclude plumber's silicone grease does not contribute to the formation of scum and may not contribute to the formation of brown particulate.

A side observation is that the grease is unaffected by temperatures of 150F.

How to Use a Paper Towel as a Particulate Filter

I show how to use a paper towel to filter particulates from electrolysis water.

Wednesday, July 9, 2008

Video #08-022, Sodium Hydroxide in Distilled Water Test

I tested sodium hydroxide (NaOH) in distilled water to observe the formation of brown and scum.


What I observed is the formation of brown is slight while no scum formed to impede the popping of bubbles.

Tuesday, July 8, 2008

Reducing Hexavalent Chromium in Waste Water

UPDATED: 4 Aug 08

I had a viewer on YouTube leave me a comment about the dangers of Hexavalent Chromium in the waste water of my Hydroxy experiments. This made me concerned about what it was I was doing, but the warning only told me to watch the movie "Erin Brokovich" to see how bad it was. Oh, and don't throw away the water.

Well, rather than rely on a movie I decide to find out what OSHA had to say about it. Essientially Hexevalent Chromium, Cr(VI) is a known carcinogen which causes cancer over long periods of exposure. It also causes cell necropsy in the lungs when inhaled. Woah! More reading indicates that the acceptable levels of exposure are set pretty low. This is unlike Trivalent Chromium, Cr(III) which is an essiential trace element.

Now that I know what kind of problem I'm dealing with, I decided to see if there is an industry solution out there. Thus the digging begins and about 2 days later the result I'm looking for pops out at me and the rest can be pieced together pretty quickly. namely, that Fe(II) can be used to reduce Cr(VI) to CR(III). Way cool! Now what does that mean to me?

More digging reveals this adobe file.Tertiary Treatment Chemical Treatment. The third paragraph, titled "Removal of Hexavalent Chromium" contained everything I needed to know about the subject, namely to reduce Cr(VI) I need to add Ferrous Sulfate and Lime to the water and let it sit awhile. It also recommended making sure 5 or 6 atoms of Fe(II) to one atom of Cr(VI) will allow the reduction to occur in timely fashion.

The chemical process is described thus:


Cr6+ + 3Fe2+ → Cr3+ + 3Fe3+

Cr3+ + 3 OH → Cr(OH)3

Fe3+ + 3 OH → Fe(OH)3


So in reading this I see that for every Chromium atom I need 6 Ferrous atoms, and I need three lime molecules for each Fe & Cr. The rough recipe then is 1Cr + 6FeSO4 + 21CaOH. This means for each 1/4 teaspoon of FeSO4 I also need to estimate about 1 teaspoon of lime for the mix. This is a slightly more lime than needed, but that should be fine. The estimate doesn't take into account any side reactions with the electrolyte itself.

From knowledge comes planning and from planning comes action. More to my line of thinking. So I know what the problem is (Cr(VI) is bad), and I know what the plan is(reduce it to Cr(III)). What's left? I need to buy the Ferrous Sulfate and Calcium Hydroxide and begin treating my waste water with it.

To solve this problem, I did some more digging and found The San Jose Scientific web site which sells lab grade ferrus sulfate in 100 gram and 500 gram increments for $8.95 or $21.50 plus shipping.

And here's a site to get the lime: hvchemical.com.

Lastly the MSDS sheet for the lime sold at hvchemical.com.

I've begun Cr(VI reduction studies on my waste water and subsequent articles record what I've done to date.

Hexavalent Chromium Articles


Next: Hexavalent Chromium Initial Test
Previous: What on Earth Am I Doing?

And Now for the Rest of the Garage

I step back and give a little tour of the garage and the rest of my babys.


Enjoy!

Saturday, July 5, 2008

More Brown Scum Testing and Observations

I spent a few more hours testing and observing the formation of brown scum.


My Observations

1. The scum component and brown component are definitely separate.

2. The scum forms first.

3. The location of the scum on the surface is the result of hydrologic processes and not plate polarity.

4. The scum gathering on the surface is the result of bubble formation adhering to the scum at the surface.

5. The scum may form a film preventing or delaying bubble bursting but is barely detectable with a spoon insertion test.

6. The scum is heavier than water as it sinks when disturbed.

7. Plastic and adhesives have not been ruled out as a source of the scum, but is low on the list of possible sources.

8. Distilled water was not used, so water contaminants are also not ruled out as a source of the scum.


Additional theories

1. The scum may be minerals in the water which are percolating out of the water.

2. The scum is a separate compound from the brown color.

How to Make Stranded Wire from Solid Wire

I put together a simple video on how to make stranded wire from smaller solid wire plus how to form it to a shape you want.


I undertook this partly because the 19 guage stainless steel wire wasn't thick enough to use for electrode wire by itself and partly because some folks might like to know how to solve such a problem.

Safety Tips

I posted this in the HHOInfo forums and feel it's good to repeat here. I may update the post from time to time so it might be good to review it occasionally.

1. I use vinegar in a 1 quart spray bottle to neutralize NaOH or KOH if I suspect I've come in contact with it, then rinse off with fresh water. Keep the vinegar spray bottle within arm's reach of the test location.

2. Eye Goggles and rubber gloves are necessary when working with NaOH or KOH at all times.

3. I wear a good quality rain coat obtained at the local thrift store when running closed tests with NaOH or KOH. For open container tests it isn't so important.

4. I built a test enclosure to perform closed tests in as I've already had the top blow off a Smack's Booster trying to run it on the start(75 Amp) setting of my battery charger. Made a nice dent in the 10 foot ceiling of my garage and might have reached 40-50 feet altitude if outside. I believe the ignition cause was heat in the lead wires, but have not eliminated spark as a possibility.

5. Do not use glass for enclosed tests. Just too unsafe.

6. SS Wire leads in the electrolyzer container should be bulky whenever possible to reduce heat in the leads. If a wire isn't thick enough then wrap multiples together by twisting with vice-grips to produce a larger wire. SS Plate steel straps should be considered in place of SS wire leads due to the greater total cross section of the strap over wire(and thus less heat). SS straps can be made from cooking utensil handles in a pinch like Smack suggests on his website. If you don't like the cost, then get the utensils at the local thrift store, Dollar Tree, or garage sale. If there is a local scrap yard, inquire about purchasing what you need from them - at scrap prices.

7. Any Ammeter reading above 25 Amps during testing is flat dangerous in my opinion as the one blow off I've experienced was measuring 30 Amps at the time. If this sort of experiment is conducted, then make absolutely certain you have properly calculated and provided the required lead size in your container. I still haven't eliminated the possibility of arcing between the leads as the electrolyzer container is essentially a capacitor and over-energizing a capacitor will cause an arc.

8. Do not inhale the gas as you just don't know what is in there besides the HHO and some of the possibilities can mean an immediate and very long dirt nap.

9. If testing inside make sure to vent the gases to the outside as the Hydrogen will build up on the ceiling and ANY electrical spark will ignite it.

10. When using NaOH be sure you have a good quality source, such as Roebic Heavy Duty Drain Cleaner or Technical Grade NaOH with stated purity over 99%.

11. NaOH concentration should be low, 1/4 teaspoon per gallon of water is usually plenty. A high Ammeter reading(greater than 15) in low temps(less than 125F) indicates too much NaOH which should be replaced or diluted with fresh water. The exception to this rule may be when testing a large number of plates, which I haven't progressed to yet.

12. If using city tap water, place it in a container to sit uncapped for at least 24 hours before using to allow any Chlorine gas to vent out. Granted the potential amount is small, but the less Chlorine you are dealing with the better.

Thursday, July 3, 2008

Plate Conditioning Brown Scum Observations

I perform a 34 minute test to further condition the simpleton plate assembly and provide observations as I go.


What I learned.

1. The "scum" forms within 2-4 minutes.

2. The "brown" begins forming shortly afterward and slowly builds concentration throughout the test.

3. The "scum" doesn't seem to progress in volume along with the test.

4. The "scum" leaves a film on a spoon that is inserted into it while the "brown" does not seem to stay on the spoon with the "scum".

5. The "scum" isn't impermeable as larger bubbles trapped in the scum will pop. Tiny bubbles do not seem to pop as readily leading me to think the scum surface tension is higher than just the electrolyte.

6. The scum with trapped bubbles behaves like thick wet soap bubbles. To watch it during electrolysis, it behaves nearly like oil on water when it's disturbed by the fluid motion caused by electrolysis. So it has its own composition which is unlike the water/NaOH mixture.

7. After stoppng electrolysis, the "scum" dissapates rapidly, almost as fast as the trapped bubbles do.

8. The "brown" goes into a kind of suspension and hovers near the surface but not necessarily on the surface.

9. Disturbing the "brown" causes it to slowly sink.

My Theories

1. The "scum" and the "brown" are seperate compounds.

2. The scum seems to be a byproduct of the electrolysis, but to a limited extent.

3. The brown evidently is rust, but requires chemical analysis.

4. The scum may or may not be a distinct compound resulting from the electrolysis. It does seem to dissipate shortly after electrolysis stops.

Wednesday, July 2, 2008

Results of Running Plate Conditioning at the 75 Amp Setting

I discover what happens when I attempt to condition plates at the 75 Amp Setting of the battery charger. Yet another disaster diverted.

Technical Change to the Smack's Booster Test Cap Assembly

I discovered a leak in the electrode assembly of the Smack's Booster Test Cap and discuss how I fixed it.

Blooper of the Day - What Happens When You Don't Know the Camera is Running

Yea, I'm human. In this case I don't know the camera is running.

Smack's Booster Test Plate Conditioning

I do the blah blah blah while watching my Smack's Booster test plates undergo conditioning. Nice brown scummy water!

Tuesday, July 1, 2008

Warning about Drain Cleaners in Hydroxy Gas Production

I had a reader warn me about the problems associated with using drain cleaners as an electrolyte in Hydroxy Gas production. Namely, most cleaners have other chemicals in them and can result in the release of Chlorine gas in addition to Hydroxy.

This concerned me greatly so I proceeded to investigate the product I bought for this purpose, Roebic Heavy Duty Crystal Drain Opener.

Here's the film clip for those that are interested.


And here is an email response to my inquiry by Mr David Lawler, Senior Microbiologist and Vice President Product Development.


--------------------------------
Charlie,

Our Heavy Duty Crystal Drain Opener is 100% sodium hydroxide. It is technical grade, not USP grade, meaning there could be trace amounts of impurities, but nothing in high enough levels to be of concern in most applications.

Thank you for choosing ROEBIC products.

David Lawler

ROEBIC LABORATORIES
--------------------------------

I believe this means I can use this particular Drain Cleaner with some assurance that harmful byproducts are minimized. If anyone can show that USP grade Sodium Hydroxide is vital to safety, then please let me know as soon as possible.

Roebic Heavy Duty Crystal Drain Cleaner - Material Safety Data Sheet