So off to the store to get yet more parts. I swear this experimenting thing just eats money like it's fillet Mignon.

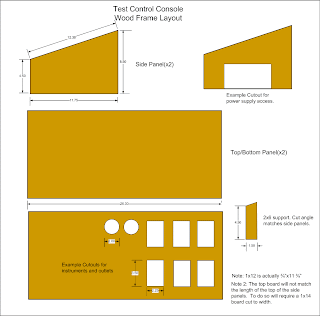
I started with a simple plan to build an open front/back box with an angled top for better ergonomics. This layout shows the dimensions I used to cut the wood.
Here's the basic frame parts after I cut them from a piece of 1x12x6 and a piece of 2x6 for extra support.
I started building the box from the bottom. I used deck screws 2" long in which case I had to drill pilot holes for each screw to avoid splitting the wood. You could use box nails instead, but it would be a little less sturdy when finished.
Here I'm screwing down the computer power supply which will provide the juice for the control panel. I had to drill 2 holes through the inside corners of the power supply case before screwing it down. There was a screw tab on the opposite side already which saved some hassle. The screws had to be less than 3/4" long to prevent coming out the bottom of the control panel.
That's done. Power Supply is in place.
OOPS! There's a lesson here. DO NOT DRILL HOLES OVER SOMETHING YOU DON"T WANT HOLES IN! The computer power supply experiment nearly came to an abrupt end.
Another view of my little gaff. Not much to see actually.
A stand back and experimental look at the work in progress.
Closeup of the Ammeter, Vacuum/Boost gauge, and Time/Temperature gauge.
Closeup of the meat thermometer.
Closeup of the two multimeters.
Closeup of the power switch.
Closeup of the Ammeter and Reostat jumpers.
Closeup of the dimmer switch as pressed into service as a reostat.
Closeup of the Igniter which was adapted from a gas grill replacement igniter kit.
Closeup of the first set of power jumpers from the ATX power supply.
Closeup of the second set of power jumpers from the ATX power supply.
Closeup view of the front of the control panel. I installed the rail to convert the space into a rat hole to store small items.
View of the left side. I added shed door handles to make it easier to move, not that it's heavy, just a little awkward without the handles.
A view of the back peeking into the rat hole.
And finaly a view of the right side with the port for the power supply.
The Finished Product
Lab Projects Articles
Related: Light Dimmer Switch as a 12 Volt Rheostat: Failure
Next: Converting a Computer ATX Power Supply to a Lab Power Supply, Part 3
Previous: Converting an ATX Power Supply to a Lab Power Supply, Part 2


No comments:
Post a Comment