The obligatory group photo of the parts and some of the tools.
- 3/8" ID clear vinyl tubing
- (2) 1/4"-20x1-1/4" 3/16" Allen Stainless Steel Cap Screws
- (2) 1/4" ID Neoprene Washers
- (4) 1/4" SAE Stainless Steel Washers
- (2) 1/4"-20 Jamb Knobs
- (6) 1/4"-20 11mm Stainless Steel Nuts
- (1) 4" PVC Cleanout Cap, Square Head
The first operation is to drill the holes for the electrode mounting bolts. The size was 1/4" to go with the 1/4"-20X1-1/4" 3/16" Allen cap screws.
The next operation is to drill the hole for the vinyl tubing. This should work fine with a 7/16" bit. The bit in the picture was 3/8". Careless of me not to measure the tubing to get the right bit size to begin with.
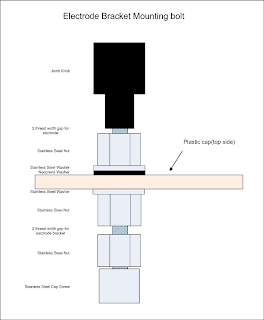
After assembly this is the finished product. The jamb nuts had to be ground a bit so they would turn in the tight space next to the square of the cap. Also, when assembling, make sure there are two threads of turn space between the first and second nut to allow for the insertion of the electrode bracket.
The underside view of the cap.

And finally the schematic of the bolt assembly.


No comments:
Post a Comment