Parts List
- (3) 2"x2"x8' white pine board
- (1) 2"x3"x8' white pine board
- (1) 1"x8"x8' white pine board
- (1) pair small door hinges
- (1) pair chest handles
- (1) 3'x10' 15 gauge hardware cloth
- (1) Door Latch
- (1lb) 2" Wood Deck Screws
- (3) packs 1/4"x1" metal roofing screws with rubber & steel washers
- (1) 1/8"x30"x30" sheet of Plexiglas
Tools List
- Saw, preferably electric
- Screwdriver, preferably an electric drill driver
- Tape Measure
- Square, Unless saw has a guide
- Pencil, Pen or Sharpie
- Sheet metal cutters
- nut driver, socket wrench 1/4", or socket adaptor for drill driver.
- 3/16" Drill bit
- Electric Drill or Hand Drill
- Scratch Awl, nail, or other sharp pointed tool
I wanted the overall dimensions to be 26" Wide by 25" Deep by 27" inches high. The plans are drawn up accordingly.
1. Cut the wood frame and door frame parts from 2"x2" and 2"x3"
- (4) 2"x2"x26"
- (3) 2"x2"x20.5"
- (4) 2"x2"x24"
- (2) 2"x3"x20.5"
- (2) 2"x2"x22"
- (2) 2"x2"x17.5"
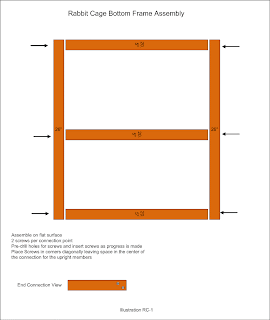
2. Assemble the bottom frame from two 26" and three 20.5" 2"x2". See Illustration RC-1.
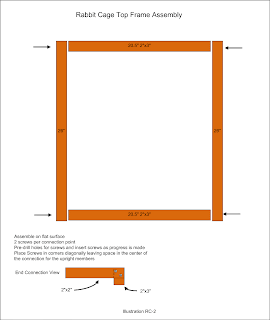
3. Assemble the top frame from two 26" 2"x2"s and the two 2"x3"s. See Illustration RC-2.
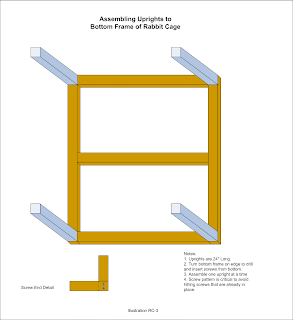
4. Take the assembled bottom frame and four 24" 2"x2"s and screw them together to form a bottom frame with side frames attached. See Illustration RC-3.
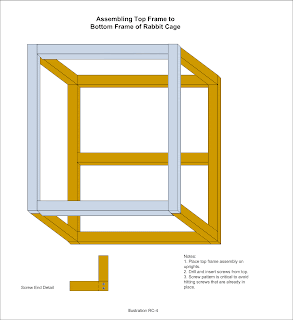
5. Take the bottom frame with attached sides and screw the top frame to it to complete the basic cage frame. See Illustration RC-4.
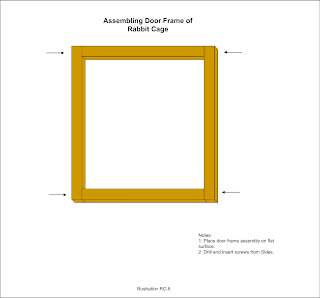
6. take the two 22" 2"x2"s and the two 17.5" 2"x2"s and screw them together to complete the basic door frame. See Illustration RC-5.
7. Cut hardware cloth to size to fit on the INSIDE of the door. Screw down starting in the corners then the center of each side of the door frame and thereafter advancing around the door frame until the hardware cloth is attached to the door frame by a screw every 4-5 inches. See Illustration RC-6.
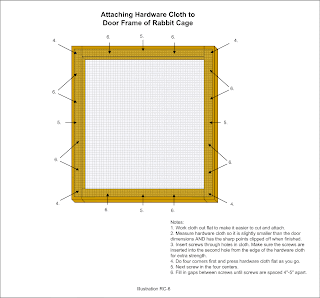
8. Cut hardware cloth to fit the right side cage frame opening and repeat the screw down procedures used in step 7. This time the hardware cloth fits on the outside of the cage. See Illustration RC-6.
9. Cut hardware cloth to fit the back cage frame opening and repeat the screw down procedures used in step 7. Again the hardware cloth fits on the outside of the cage. See Illustration RC-6.
10. Cut 2 pieces of hardware cloth to fit the top cage frame opening, place the two pieces together one on top of the other and repeat the screw down procedures used in step 7. Once again the hardware cloth fits on the outside of the cage. See Illustration RC-6.
11. Cut three 1"x8"x26" pieces of wood and notch two of them so all three will fit in the bottom of the cage as a floor. Screw down with 2 screws per board at each end.
12. Mount the hinges to the door by aligning the hinges to the left edge of the door and screw them down. Place a piece of cardboard on the bottom of the cage hanging out a little where the door will mount. This technique serves as a spacer. Screw down the hinges to the cage frame.
13. Mount the cage carry handles to the 2"x3" sections of the upper portion of the cage, first by measuring the length and marking the center, then screw them down.
14. Mount the door latch to the door by screwing it down, then mount the door latch catch to the cage frame by screwing it down.
15. Make sure the Plexiglas sheet is cut to fit the front opening of the cage. Carefully drill large enough holes in the Plexiglas sheet so the screws will pass through the sheet without the threads hanging up. Mount the Plexiglas sheet first by the top two corners then the bottom two corners, then finish by screwing down the rest of the screws.
16. Cleanup.
Lab Projects Articles
Next: Building a Hydrogen Exhaust Hood
Previous: Introducing the Rabbit Cage


