Otherwise the brown particulate occurred as normal.
Showing posts with label generation. Show all posts
Showing posts with label generation. Show all posts
Monday, August 11, 2008
Plate Conditioning with a +10n- Plate Brick
I conducted plate conditioning with a +10n- plate brick. I was after conditioned plates, while at the same time I wanted to see what would happen with this particular setup. I estimated that I would have 12/11= 1.09 volts across the plate gaps. Unfortunately I must have placed the plates too close together.
Otherwise the brown particulate occurred as normal.
Otherwise the brown particulate occurred as normal.


Sunday, August 10, 2008
Observational Electrolyte Test Series Summary
The Observational Electrolyte Test Series was intended to provide a body of work where the electrolytes were subjected to cooking, mostly by way of just two plates. The results were then observed and recorded. The primary intent was to observe particulate and scum formation along with additional data as it was observed. While I attempted an observational assessment of gas production, it was not a parameter or goal of the test.
To date I've tested the following electrolytes.
I note that for the purposes of this test, there were three classifications of effect and two that I recorded. Particulate is the formation of solids in the electrolyte, usually brown. Particulate usually settles on the bottom after testing with the exception of vinegar. Scum is the formation of a surface viscus mass that interferes with bubbles bursting. Scum does not seem to have a color of it's own and usually dissolves back into the water within a few minutes of electrolysis. Foam is similar to scum in the interference of bubble bursting, but without direct observation of a substance on the surface. Foam usually lingers on the surface for awhile after electrolysis. Foam measurements were not taken, but foam formation did cause me to abort the CLR test.
I determined early on that using distilled water or reverse osmosis purified water has by far the least effect on particulate formation. This in turn causes me to assert that ordinary tap water with high mineral content should be avoided when performing electrolysis. Softened water is also better than plain tap water, but is still second to distilled or reverse osmosis purified water.
Despite some inconsistencies in the tests these are the results. I may add tests to this series but felt there was enough of a body of work to produce a summary.
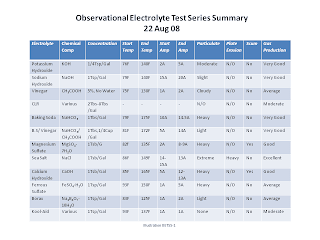
I also note that compounds containing Magnesium or Calcium should be avoided as they leave hard water deposits on the container and plates.
NOTE: Wear hearing protection when igniting a foam buildup!!! Igniting foam makes a sound at least as loud as a high caliber rifle or shotgun.
To date I've tested the following electrolytes.
- Potassium Hydroxide (KOH)
- Sodium Hydroxide (NaOH)
- Vinegar(CH3COOH)
- CLR (Calcium, Lime & Rust Cleaner, proprietary mix)
- Baking Soda (NaHCO3)
- Baking Soda/Vinegar (NaHCO3/CH3COOH)
- Magnesium Sulfate (MgSO4·7H2O)
- Sea Salt/Sodium Silicate (NaCl)
- Calcium Hydroxide (CaOH)
- Ferrous Sulfate (FeSO4·H2O)
- Borax (Na2B4O7·10H2O)
- Kool-Aid (Citric Acid, Ascorbic Acid, others)
I note that for the purposes of this test, there were three classifications of effect and two that I recorded. Particulate is the formation of solids in the electrolyte, usually brown. Particulate usually settles on the bottom after testing with the exception of vinegar. Scum is the formation of a surface viscus mass that interferes with bubbles bursting. Scum does not seem to have a color of it's own and usually dissolves back into the water within a few minutes of electrolysis. Foam is similar to scum in the interference of bubble bursting, but without direct observation of a substance on the surface. Foam usually lingers on the surface for awhile after electrolysis. Foam measurements were not taken, but foam formation did cause me to abort the CLR test.
I determined early on that using distilled water or reverse osmosis purified water has by far the least effect on particulate formation. This in turn causes me to assert that ordinary tap water with high mineral content should be avoided when performing electrolysis. Softened water is also better than plain tap water, but is still second to distilled or reverse osmosis purified water.
Despite some inconsistencies in the tests these are the results. I may add tests to this series but felt there was enough of a body of work to produce a summary.

I also note that compounds containing Magnesium or Calcium should be avoided as they leave hard water deposits on the container and plates.
NOTE: Wear hearing protection when igniting a foam buildup!!! Igniting foam makes a sound at least as loud as a high caliber rifle or shotgun.
Observational Electrolysis Test using Potassium Hydroxide
I conduct an observational electrolysis test using potassium hydroxide (KOH) as the electrolyte and observe the results.
My Observations
1 The electrolyte particulates out about 3/16Th of an inch before the test begins.
2. Brown particulate forms about 1/4 inch during the test.
3. Foam forms on the surface and stays there during the test.
4. Gas production is quite good.
5. Some brown particulate makes its way into the foam. It doesn't appear to be of the scum variety.
6. I used quite a bit less KOH in this test than the electrolytes in other tests.
7. I suspect my batch of KOH is an inferior grade.
Next:
Previous: Grape Kool-Aid Long Term Particulate Comparison Test
My Observations
1 The electrolyte particulates out about 3/16Th of an inch before the test begins.
2. Brown particulate forms about 1/4 inch during the test.
3. Foam forms on the surface and stays there during the test.
4. Gas production is quite good.
5. Some brown particulate makes its way into the foam. It doesn't appear to be of the scum variety.
6. I used quite a bit less KOH in this test than the electrolytes in other tests.
7. I suspect my batch of KOH is an inferior grade.
Electrolytes & Electrolyte Testing Articles
Next:
Previous: Grape Kool-Aid Long Term Particulate Comparison Test
Saturday, August 9, 2008
Hydrogen Facts and Figures
I went out on a quest to gather bits and pieces of information I felt was relevant to Hydrogen Gas as produced during electrolysis of water. This is by no means a complete list, it is rather a collection of pertinent facts I felt were relevant to the electrolysis of water and the subsequent handling of the gas. As such this list will likely change as I gain knowledge on the subject.
Represented in the Periodic Table by the symbol H.
Has atomic weight of 1.
Has one proton and one electron.
Sometimes has one or two neutrons.
Atomic mass of 1.00974 amu
Is the lightest of elements, and the most common, comprising 75% of the mass of the known universe and 90% of all atoms.
Almost never found in its free state on Earth.
Largest industrial uses are fossil fuel upgrading also known as hydro-cracking among others and ammonia production for fertilizer.
Hydrogen is classified as a flammable gas and will react with any of a host of oxidizers. Notably, Air, Chlorine, Florine, Nitric Oxide, Nitrogen Dioxide, and Oxygen.
Hydrogen can violently and spontaneously react with Chlorine and Florine at room temperature.
Hydrogen will burn at approximately 4% concentration in air and the upper limit is approximately 75% concentration in air. EngineeringToolbox.com has a comparison of the different flammable gases.
Hydrogen will ignite at 560 degrees Celsius or 1040 degrees Fahrenheit. The hydrogen ignition temperature behaves on a curve where the ignition temperature actually is lower at lower concentrations and will ignite as low as 910F at 8-15% volume in air. At concentrations similar to those found in electrolysis, the heat ignition point is about 1080F.
See Hydrogen Leakage Detection & Safety, Jones, Pg 16
Hydrogen burns with oxygen in the ultraviolet range making the flame nearly invisible to the naked eye.
Hydrogen has two different types of diatomic molecules that are identified by the spin of their nuclei. The excited state orthohydrogen forms about 25 percent of hydrogen gas at standard temperature and pressure while parahydrogen makes up the rest.
Hydrogen has an adiabatic flame temperature in air of 3712.73 degrees Fahrenheit.
Hydrogen has a flame quenching distance of approximately .3mm and a mesh engineered to less than this distance will prevent flame propagation. This distance is equal to .01181 In or about 3/256th of an inch(.01172In). This is in the same range as the diameter of a human hair. Reference
According to testing done by Dr William Rhodes, the flame propagation rate of ducted Hydrogen-Oxygen gas is 8160 feet per second or approximately Mach 7.5.
Next:
Previous: What on Earth am I Doing?
Hydrogen Facts and Figures
Represented in the Periodic Table by the symbol H.
Has atomic weight of 1.
Has one proton and one electron.
Sometimes has one or two neutrons.
Atomic mass of 1.00974 amu
Is the lightest of elements, and the most common, comprising 75% of the mass of the known universe and 90% of all atoms.
Almost never found in its free state on Earth.
Largest industrial uses are fossil fuel upgrading also known as hydro-cracking among others and ammonia production for fertilizer.
Hydrogen is classified as a flammable gas and will react with any of a host of oxidizers. Notably, Air, Chlorine, Florine, Nitric Oxide, Nitrogen Dioxide, and Oxygen.
Hydrogen can violently and spontaneously react with Chlorine and Florine at room temperature.
Hydrogen will burn at approximately 4% concentration in air and the upper limit is approximately 75% concentration in air. EngineeringToolbox.com has a comparison of the different flammable gases.
Hydrogen will ignite at 560 degrees Celsius or 1040 degrees Fahrenheit. The hydrogen ignition temperature behaves on a curve where the ignition temperature actually is lower at lower concentrations and will ignite as low as 910F at 8-15% volume in air. At concentrations similar to those found in electrolysis, the heat ignition point is about 1080F.
See Hydrogen Leakage Detection & Safety, Jones, Pg 16
Hydrogen burns with oxygen in the ultraviolet range making the flame nearly invisible to the naked eye.
Hydrogen has two different types of diatomic molecules that are identified by the spin of their nuclei. The excited state orthohydrogen forms about 25 percent of hydrogen gas at standard temperature and pressure while parahydrogen makes up the rest.
Hydrogen has an adiabatic flame temperature in air of 3712.73 degrees Fahrenheit.
Hydrogen has a flame quenching distance of approximately .3mm and a mesh engineered to less than this distance will prevent flame propagation. This distance is equal to .01181 In or about 3/256th of an inch(.01172In). This is in the same range as the diameter of a human hair. Reference
According to testing done by Dr William Rhodes, the flame propagation rate of ducted Hydrogen-Oxygen gas is 8160 feet per second or approximately Mach 7.5.
Facts and Figures Articles
Next:
Previous: What on Earth am I Doing?
Tuesday, August 5, 2008
Grape Kool-Aid Long Term Particulate Comparison Test
I perform a quick comparison between the Grape Kool-Aid Long duration sample and two samples from the short term tests.
It was bit disappointing to see that the Kool-Aid broke down after an extended period. This does give me ideas on new things to try.
Next: Observational Electrolysis Test Using Potassium Hydroxide
Previous: Overnight Observational Test with Grape Kool-Aid
It was bit disappointing to see that the Kool-Aid broke down after an extended period. This does give me ideas on new things to try.
Electrolytes & Electrolyte Testing Articles
Next: Observational Electrolysis Test Using Potassium Hydroxide
Previous: Overnight Observational Test with Grape Kool-Aid
Additional Information on Rotameters
I go over the info I have on Rotameters and how to go about buying one if necessary. I also point out that they are not a cheap means of measuring gas where the existing water displacement method works just fine.
Next: Make an Extension Cable for the Scan Gauge II
Previous: The Finished Rotameter Project
Gadgets & Gizmos Articles
Next: Make an Extension Cable for the Scan Gauge II
Previous: The Finished Rotameter Project
The Finished Rotameter Project
I go over the finished Rotameter I intend to use to measure HHO gas production with. I also give a little demo of the thing in action when I blow air through it.
Works for me.
Next:
Previous: Rotameter Box Schematic Diagrams
Works for me.
Gadgets & Gizmos Articles
Next:
Previous: Rotameter Box Schematic Diagrams
Monday, August 4, 2008
Rotameter Box Schematic Diagrams
I threw together the schematic diagrams for making a Rotameter box. There really isn't much to building this sort of thing, it just takes some special tools to do it the way I did.
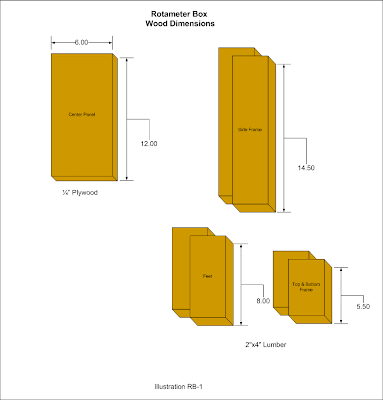
The first illustration shows the wood dimensions.
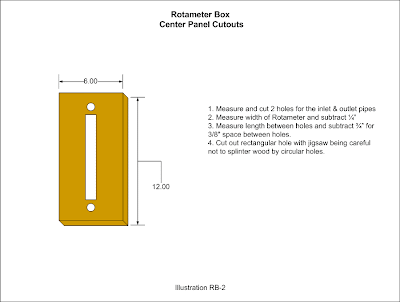
The second illustration shows the cuts to make in the center panel.
The third illustration shows the slots to cut in the frame pieces.
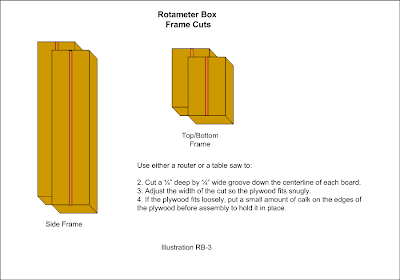
After cutting everything, the center panel and frame pieces are put together, lined up and fastened together using 2 inch deck screws, 2 per joint.
Next the feet are attached using 2 inch deck screws, 4 per foot.
The back light was a cheap outside light disassembled using a Dremel tool to cut away the riveted portion of the bracket, then the light fixture and bare bracket are attached to the wood frame using a 1 inch wood screw and washer. After that it's just a matter of wiring a lamp cord or extension cord wire to the light and nailing it down with wiring staples.
To see visually how everything goes together, just check out the video in Introducing the Rotameter
Next: The Finished Rotameter Project
Previous: Introducing the Rotameter
The first illustration shows the wood dimensions.
The second illustration shows the cuts to make in the center panel.
The third illustration shows the slots to cut in the frame pieces.
After cutting everything, the center panel and frame pieces are put together, lined up and fastened together using 2 inch deck screws, 2 per joint.
Next the feet are attached using 2 inch deck screws, 4 per foot.
The back light was a cheap outside light disassembled using a Dremel tool to cut away the riveted portion of the bracket, then the light fixture and bare bracket are attached to the wood frame using a 1 inch wood screw and washer. After that it's just a matter of wiring a lamp cord or extension cord wire to the light and nailing it down with wiring staples.
To see visually how everything goes together, just check out the video in Introducing the Rotameter
Gadgets & Gizmos Articles
Next: The Finished Rotameter Project
Previous: Introducing the Rotameter
Sunday, August 3, 2008
Introducing the Rotameter
I went out on Ebay and acquired a Rotameter to measure my gas production with. While using pop bottles is a cheap way of doing so, I wanted to be able to monitor the gas flow more often to see if there is a distinct correlation between heat, current and gas production. Measuring once in a while with a bottle doesn't really do that, without making a mess of course.
The answer was the Rotameter. This one had too much capacity for the current projects, but I was able to get another tube with the capacity range I'm likely to see for now. Even with the second tube I paid less than retail for the whole rig.
Sweet!
Next: Rotameter Box Schematic Diagrams
Previous: Receiving and Setting up a Scan Gauge II
The answer was the Rotameter. This one had too much capacity for the current projects, but I was able to get another tube with the capacity range I'm likely to see for now. Even with the second tube I paid less than retail for the whole rig.
Sweet!
Gadgets & Gizmos Articles
Next: Rotameter Box Schematic Diagrams
Previous: Receiving and Setting up a Scan Gauge II
Overnight Observational Test with Grape Kool-Aid
I was impressed with the Kool-Aid as an electrolyte so I decided to let the test run overnight. In the morning Cinderella had a pumpkin. Darn.
My Observations
1. The electrolyte clouds up overnight.
2. The plates had a brown patina that took awhile to remove in the CLR.
3. No noted corrosion on the plates.
4. After settling, the particulate was about 3/4" deep.
Next: Grape Kool-Aid Long Term Particulate Comparison Test
Previous: Observational Electrolyte Test with Grape Kool-Aid
My Observations
1. The electrolyte clouds up overnight.
2. The plates had a brown patina that took awhile to remove in the CLR.
3. No noted corrosion on the plates.
4. After settling, the particulate was about 3/4" deep.
Electrolytes & Electrolyte Testing Articles
Next: Grape Kool-Aid Long Term Particulate Comparison Test
Previous: Observational Electrolyte Test with Grape Kool-Aid
Observational Electroyte Test with Grape Kool-Aid
Nope. Not a joke. I conduct an observational electrolyte test using grape Kool-Aid. For short tests, it really appears to work.
My Observations
1. Gas production is moderate
2. the mix clears up and becomes a brownish-purple at test end.
3. No significant particulates are observed. (Wait for the overnight test on this).
Next: Overnight Observational Electrolyte Test with Grape Kool-AidPrevious: Precipitate Comparison Test; Borax and Sea Salt with Calcium Silicate
My Observations
1. Gas production is moderate
2. the mix clears up and becomes a brownish-purple at test end.
3. No significant particulates are observed. (Wait for the overnight test on this).
Electrolytes & Electrolyte Testing Articles
Next: Overnight Observational Electrolyte Test with Grape Kool-AidPrevious: Precipitate Comparison Test; Borax and Sea Salt with Calcium Silicate
Saturday, August 2, 2008
Receiving and Setting up a Scan Gauge II
I received a Scan Gauge II in the mail today and went about setting it up.
I had no difficulty setting it up. It pretty much didn't need anything but the actual gas tank size.
The ODBC port on a Ford Ranger is right under the steering wheel at the bottom of the dash.
Next:
Previous: Building a Housing for an Electric Watt Hour Meter
I had no difficulty setting it up. It pretty much didn't need anything but the actual gas tank size.
The ODBC port on a Ford Ranger is right under the steering wheel at the bottom of the dash.
Gadgets and Gizmos Articles
Next:
Previous: Building a Housing for an Electric Watt Hour Meter
Still Cooler Design Testing
I build an electrolyte still cooler and proceed to test the various aspects of the design and practical application.
UPDATE: The cheapie fuel pump I was using failed on the first long duration test. So it's back to the Internet to find something suitable. I still think the still cooler is capable of handling the heat exchanging duties, if only I can find a reliable 12 volt pump.
My Observations
1. The fuel pump will self sump the system.
2. The system will more or less purge itself.
3. The fuel pump will allow the system to drain.
4. A static test leads me to think it will reduce the temperature 10-20 degrees while sitting still. The numbers will be greater while in motion. It would take further tests to be sure as I think diluting the electrolyte skewed the results on this particular test to show a 37 degree drop.
Related:
Next:
Previous: More Info on making Stainless Steel Stranded Wire
UPDATE: The cheapie fuel pump I was using failed on the first long duration test. So it's back to the Internet to find something suitable. I still think the still cooler is capable of handling the heat exchanging duties, if only I can find a reliable 12 volt pump.
My Observations
1. The fuel pump will self sump the system.
2. The system will more or less purge itself.
3. The fuel pump will allow the system to drain.
4. A static test leads me to think it will reduce the temperature 10-20 degrees while sitting still. The numbers will be greater while in motion. It would take further tests to be sure as I think diluting the electrolyte skewed the results on this particular test to show a 37 degree drop.
Adaptive Engineering Articles
Related:
Next:
Previous: More Info on making Stainless Steel Stranded Wire
Friday, August 1, 2008
Initial Electrolysis Test with a 12VDC Neon Sign Transformer
I conduct an initial test with a sign transformer and get disappointed with the results.
I have two ideas on how to proceed
1. Adjust the plate gap closer, probably 1 millimeter apart.
2. Add capacitance to the circuit in some way.
Next:
Previous: What on Earth am I Doing?
I have two ideas on how to proceed
1. Adjust the plate gap closer, probably 1 millimeter apart.
2. Add capacitance to the circuit in some way.
High Voltage Articles
Next:
Previous: What on Earth am I Doing?
Precipitate Comparison Test; Borax and Sea Salt with Calcium Silicate
I perform a quick precipitate comparison between borax and sea salt with calcium silicate. The difference is startling to say the least.
I note that much of the precipitate has got to be the eroded material from one of the plates. This can only mean that there is a high concentration of Chromium in the sea salt sample and a simple 1/4 teaspoon of ferrous sulfate will not be enough to reduce the Cr(VI) to Cr(III).
Related: Observational Test Using Sea Salt
After Electrolysis Observations, Sea Salt and Calcium Silicate
Next: Observational Electrolyte Test with Grape Kool-Aid
Previous: Observational Electrolyte Test Using Ferrous Sulfate
I note that much of the precipitate has got to be the eroded material from one of the plates. This can only mean that there is a high concentration of Chromium in the sea salt sample and a simple 1/4 teaspoon of ferrous sulfate will not be enough to reduce the Cr(VI) to Cr(III).
Electrolyte & Electrolyte Testing Articles
Related: Observational Test Using Sea Salt
After Electrolysis Observations, Sea Salt and Calcium Silicate
Next: Observational Electrolyte Test with Grape Kool-Aid
Previous: Observational Electrolyte Test Using Ferrous Sulfate
Thursday, July 31, 2008
Observational Electrolyte test using Ferrous Sulfate
I conduct an observational electrolyte test using ferrous sulfate and observe the results.
My Observations
1. The mixture starts out a cloudy orangish brown.
2. if allowed to sit for a short period a film develops on the surface.
3. After only 30 seconds a bluish green particulate begins to form.
4. The blue-green particulate tends to float and form a scum.
5. After 6-10 minutes the blue-green particulate changes color to orange-brown and begins to sink.
6. The cloudy aspect of the mixture clears up after 5 minutes or so as the particulates begin to appear.
7. Particulates settle throughout the test eventually building to one inch in the bottom after an hour.
8. after an hour or so a slight odor is noticeable.
9. The negative side plate accumulates a dark deposit similar to magnesium sulfate, but in slightly larger quantity.
Next: Particulate Comparison Test, Borax and Sea Salt with Calcium Silicate
Previous: After Electrolysis Observations; Sea salt & Calcium Silicate
My Observations
1. The mixture starts out a cloudy orangish brown.
2. if allowed to sit for a short period a film develops on the surface.
3. After only 30 seconds a bluish green particulate begins to form.
4. The blue-green particulate tends to float and form a scum.
5. After 6-10 minutes the blue-green particulate changes color to orange-brown and begins to sink.
6. The cloudy aspect of the mixture clears up after 5 minutes or so as the particulates begin to appear.
7. Particulates settle throughout the test eventually building to one inch in the bottom after an hour.
8. after an hour or so a slight odor is noticeable.
9. The negative side plate accumulates a dark deposit similar to magnesium sulfate, but in slightly larger quantity.
Electrolytes and Electrolyte Testing Articles
Next: Particulate Comparison Test, Borax and Sea Salt with Calcium Silicate
Previous: After Electrolysis Observations; Sea salt & Calcium Silicate
More Info on Making SS Stranded Wire
I share more information on making stainless steel stranded wire from a single 19 guage wire.
Related: How to make Stranded Wire From Solid Wire
Next:
Previous: Test and Set a Variable Pressure Relief Valve
Adaptive Engineering Articles
Related: How to make Stranded Wire From Solid Wire
Next:
Previous: Test and Set a Variable Pressure Relief Valve
Test & Set a Variable Pressure Relief Valve
I test and set a variable pressure relief valve using reckoning(or estimation).
My Findings
1. The yellow spring is for the lowest pressure range: 20-50PSI
2. The relief valve is relatively insensitive.
3. After spring contact with the valve between 1/8th and 1/4 turn should yield between 22 and 26 pounds blow off pressure.
Next:
Previous: More Info on Making SS Stranded Wire
My Findings
1. The yellow spring is for the lowest pressure range: 20-50PSI
2. The relief valve is relatively insensitive.
3. After spring contact with the valve between 1/8th and 1/4 turn should yield between 22 and 26 pounds blow off pressure.
Adaptive Engineering Articles
Next:
Previous: More Info on Making SS Stranded Wire
Grade School Science Fun with a Nine Volt Battery
I have a bit of fun with a nine volt battery and a container of electrolyte.
What did I learn?
1. Hydrogen makes really fine bubbles.
2. Oxygen makes relatively large bubbles
3. Hydrogen is attracted to the negative terminal
4. Oxygen is attracted to the positive terminal
5. The relative bubble sizes can be explained by the atomic weight of the two molecules. Since hydrogen is so light, it stands to reason that it would tend to breakaway from the electrode sooner than the oxygen would.
6. One proof is in the oxidation that occurs on the positive electrode of the battery.
What did I learn?
1. Hydrogen makes really fine bubbles.
2. Oxygen makes relatively large bubbles
3. Hydrogen is attracted to the negative terminal
4. Oxygen is attracted to the positive terminal
5. The relative bubble sizes can be explained by the atomic weight of the two molecules. Since hydrogen is so light, it stands to reason that it would tend to breakaway from the electrode sooner than the oxygen would.
6. One proof is in the oxidation that occurs on the positive electrode of the battery.
Wednesday, July 30, 2008
After Electrolysis Observations; Sea Salt & Calcium Silicate
I make some significant observations regarding sea salt and calcium silicate.
My Observations
1. The amount of particulate is extreme and has a dark almost black appearance.
2. CLR does NOT cleanup the plates worth a darn.
3. The Positive(?) plate is eroded pretty badly. The erosion is most notable along the plate edges and pitting pretty bad on the side of the plate facing the negative plate.
4. The gunk even blackens the CLR.
5. The temperature electrode was pitted as well.
6. I suspect if there ever was a candidate for Cr(VI) or Hexavalent Chromium reduction, this sample is it. The mere evidence of erosion of one of the plates is proof enough that there is significant chromium in the particulate.
Related: Precipitate Comparison Test; Borax and Sea Salt with Calcium Silicate
Next: Observational Electrolyte Test Using Ferrous Sulfate
Previous: Observational Electrolysis Test Using Sea Salt
My Observations
1. The amount of particulate is extreme and has a dark almost black appearance.
2. CLR does NOT cleanup the plates worth a darn.
3. The Positive(?) plate is eroded pretty badly. The erosion is most notable along the plate edges and pitting pretty bad on the side of the plate facing the negative plate.
4. The gunk even blackens the CLR.
5. The temperature electrode was pitted as well.
6. I suspect if there ever was a candidate for Cr(VI) or Hexavalent Chromium reduction, this sample is it. The mere evidence of erosion of one of the plates is proof enough that there is significant chromium in the particulate.
Electrolyte & Electrolyte Testing Articles
Related: Precipitate Comparison Test; Borax and Sea Salt with Calcium Silicate
Next: Observational Electrolyte Test Using Ferrous Sulfate
Previous: Observational Electrolysis Test Using Sea Salt
Subscribe to:
Posts (Atom)

 Posts
Posts


