Showing posts with label project. Show all posts

Sunday, July 27, 2008

Building a Housing for an Electric Watt Hour Meter

I decided I needed to know how much electricity I'm using to do my experiments, so I went out and shopped victoriously on Ebay for an electric meter. The meter I bought is an older model, a General Electric GE IW-70-S which only sports 4 main wiring blades. The newer model I-70-S has 5 or 6 main wiring blades and will be wired differently than the one I have.

Once It arrived in the mail I was left with the dilemma of how to actually put it to use. The answer showed up in the form of a woodworking 101 project.


The entire project took about 4 hours of my time over two days and cost me a total of around 60-65 Dollars. It would be more or less depending on the meter since they are running 10 to 40 bucks and what bells and whistles you would want on your housing.

Here's some support info for the meter housing.


The list of wiring guides are at the General Electric Meter Wiring Guides in case you are using a different model of GE meter.

And the Parts List

  • (1) Carry handle
  • (1) used extension cord to be remade into the power cord (20 feet will do)
  • (1) pound box of 2" deck screws
  • (1) 1"x10"x8' pine board to cut down according to MB-1
  • (1) 9" 2"x4" scrap board to cut down to 1"x1-1/2"x9"
  • (4) 1/4"-20x1" bolts
  • (4) 1/4"-20 nuts
  • (8) 1/4" washers
  • (2) 3/8"-16x2" Bolts
  • (2) 3/8"-16 nuts
  • (2) 3/8" washers
  • (2) Coat Hooks with mounting screws
  • (1) JB Weld or equivalent epoxy
  • (2) 1-5/8" Screws
  • (1) 3 gang electrical box, old work
  • (1) 3 gang switch cover, large square type
  • (1) rocker type light switch
  • (2) outlets, square face type
  • (1) 5 foot length 12/2 or 14/2 electrical wire.
  • (1) GE Watt Hour Meter, IW-70-S model preferred, but I-70-S works too.
javascript:void(0)
Publish Post

Gadgets & Gizmos Articles


Next: Receiving and Setting Up a Scan Gauge II
Previous:

Lab Projects Articles


Next:
Previous: Changes to the Test Pressure Chamber

Saturday, July 12, 2008

Building a Hydrogen Exhaust Hood

I spent the better part of two days building a hydrogen exhaust hood and while the result is worth the effort I'm getting a bit tired of my old camera cutting off on me.


The entire project cost me about 40 Dollars and it is the very essence of "cheap but effective". If you have need of something similar, I hope this serves as an inspiration for ya.

Lab Projects Articles


Next: Demo of Auxiliary Power Input on the Test Control Panel
Previous: Test Enclosure Parts and Plans

Friday, July 11, 2008

Some Test Recording Equipment

I ramble on a bit about some of the test equipment I use and would recommend for anyone wishing to record their tests and experiments.


In short, a camera, a tripod and a battery charger with rechargable batteries are all essientiel to recording experiments.

Wednesday, July 2, 2008

Technical Change to the Smack's Booster Test Cap Assembly

I discovered a leak in the electrode assembly of the Smack's Booster Test Cap and discuss how I fixed it.

Tuesday, July 1, 2008

Warning about Drain Cleaners in Hydroxy Gas Production

I had a reader warn me about the problems associated with using drain cleaners as an electrolyte in Hydroxy Gas production. Namely, most cleaners have other chemicals in them and can result in the release of Chlorine gas in addition to Hydroxy.

This concerned me greatly so I proceeded to investigate the product I bought for this purpose, Roebic Heavy Duty Crystal Drain Opener.

Here's the film clip for those that are interested.


And here is an email response to my inquiry by Mr David Lawler, Senior Microbiologist and Vice President Product Development.


--------------------------------
Charlie,

Our Heavy Duty Crystal Drain Opener is 100% sodium hydroxide. It is technical grade, not USP grade, meaning there could be trace amounts of impurities, but nothing in high enough levels to be of concern in most applications.

Thank you for choosing ROEBIC products.

David Lawler

ROEBIC LABORATORIES
--------------------------------

I believe this means I can use this particular Drain Cleaner with some assurance that harmful byproducts are minimized. If anyone can show that USP grade Sodium Hydroxide is vital to safety, then please let me know as soon as possible.

Roebic Heavy Duty Crystal Drain Cleaner - Material Safety Data Sheet

Monday, June 30, 2008

Test Enclosure Parts and Plans

The Rabbit Cage was a straight forward construction project, with the aim to produce a means of containing the flying debris should an explosion occur.

Parts List

  • (3) 2"x2"x8' white pine board
  • (1) 2"x3"x8' white pine board
  • (1) 1"x8"x8' white pine board
  • (1) pair small door hinges
  • (1) pair chest handles
  • (1) 3'x10' 15 gauge hardware cloth
  • (1) Door Latch
  • (1lb) 2" Wood Deck Screws
  • (3) packs 1/4"x1" metal roofing screws with rubber & steel washers
  • (1) 1/8"x30"x30" sheet of Plexiglas


Tools List

  • Saw, preferably electric
  • Screwdriver, preferably an electric drill driver
  • Tape Measure
  • Square, Unless saw has a guide
  • Pencil, Pen or Sharpie
  • Sheet metal cutters
  • nut driver, socket wrench 1/4", or socket adaptor for drill driver.
  • 3/16" Drill bit
  • Electric Drill or Hand Drill
  • Scratch Awl, nail, or other sharp pointed tool


I wanted the overall dimensions to be 26" Wide by 25" Deep by 27" inches high. The plans are drawn up accordingly.

1. Cut the wood frame and door frame parts from 2"x2" and 2"x3"

  • (4) 2"x2"x26"
  • (3) 2"x2"x20.5"
  • (4) 2"x2"x24"
  • (2) 2"x3"x20.5"
  • (2) 2"x2"x22"
  • (2) 2"x2"x17.5"


2. Assemble the bottom frame from two 26" and three 20.5" 2"x2". See Illustration RC-1.


3. Assemble the top frame from two 26" 2"x2"s and the two 2"x3"s. See Illustration RC-2.
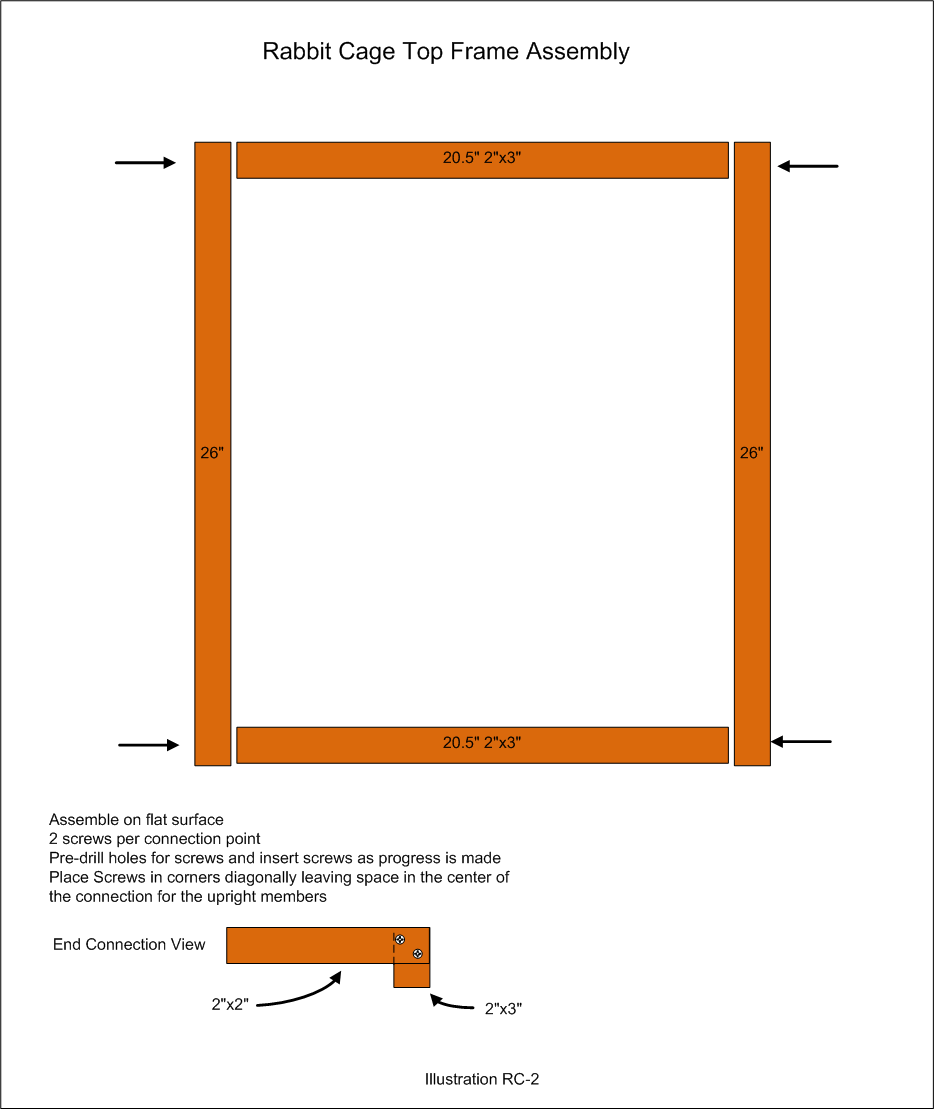


4. Take the assembled bottom frame and four 24" 2"x2"s and screw them together to form a bottom frame with side frames attached. See Illustration RC-3.


5. Take the bottom frame with attached sides and screw the top frame to it to complete the basic cage frame. See Illustration RC-4.


6. take the two 22" 2"x2"s and the two 17.5" 2"x2"s and screw them together to complete the basic door frame. See Illustration RC-5.


7. Cut hardware cloth to size to fit on the INSIDE of the door. Screw down starting in the corners then the center of each side of the door frame and thereafter advancing around the door frame until the hardware cloth is attached to the door frame by a screw every 4-5 inches. See Illustration RC-6.


8. Cut hardware cloth to fit the right side cage frame opening and repeat the screw down procedures used in step 7. This time the hardware cloth fits on the outside of the cage. See Illustration RC-6.

9. Cut hardware cloth to fit the back cage frame opening and repeat the screw down procedures used in step 7. Again the hardware cloth fits on the outside of the cage. See Illustration RC-6.

10. Cut 2 pieces of hardware cloth to fit the top cage frame opening, place the two pieces together one on top of the other and repeat the screw down procedures used in step 7. Once again the hardware cloth fits on the outside of the cage. See Illustration RC-6.

11. Cut three 1"x8"x26" pieces of wood and notch two of them so all three will fit in the bottom of the cage as a floor. Screw down with 2 screws per board at each end.

12. Mount the hinges to the door by aligning the hinges to the left edge of the door and screw them down. Place a piece of cardboard on the bottom of the cage hanging out a little where the door will mount. This technique serves as a spacer. Screw down the hinges to the cage frame.

13. Mount the cage carry handles to the 2"x3" sections of the upper portion of the cage, first by measuring the length and marking the center, then screw them down.

14. Mount the door latch to the door by screwing it down, then mount the door latch catch to the cage frame by screwing it down.

15. Make sure the Plexiglas sheet is cut to fit the front opening of the cage. Carefully drill large enough holes in the Plexiglas sheet so the screws will pass through the sheet without the threads hanging up. Mount the Plexiglas sheet first by the top two corners then the bottom two corners, then finish by screwing down the rest of the screws.

16. Cleanup.

Lab Projects Articles


Next: Building a Hydrogen Exhaust Hood
Previous: Introducing the Rabbit Cage

Thursday, June 26, 2008

Introducing the Rabbit Cage

After the test accident I suspended testing until I built an enclosure to house the electrolyzer containers in case of a blow off and the result is the Rabbit Cage.


It still needs to have her "Baptism of Fire" to make sure it's sturdy enough to call safe. We'll see after the next round of carnage.

Lab Projects Articles


Next: Test Enclosure, Parts and Plans
Previous: Changes to the Test Control Panel - 24 June 08